Thursday, June 14, 2012

My Favorites

There have been a few staple online magazines on the knitting scene for a while, but with new mags popping up here and there so, I thought that I would post about some of my favorite online knitting magazines. (This list is strictly my favorites.)


URL: http://www.knitty.com
Date Began: 2002
Patterns: Free
Focus: Varity of knits and crochet
Interesting Tidbits: Articles, Shop, Blog, Fourm, How to, etc....
Published: September, December, March, June


URL: http://www.twistcollective.com
Date Began: 2008
Patterns: Paid Individually
Focus: Varity
Interesting Tidbits: Blog, Articles, Shop, etc...
Published: 3x year


Petite Purls

URL: http://petitepurls.com
Date Began: 2009
Patterns: Free
Focus: Childrens Patterns
Interesting Tidbits: Crochet, Sewing, Blog...
Published: January, April, July, October


URL: http://stixyarn.com/tangled/
Date Began: 2010
Patterns: Both free and paid
Focus: Varity of knits
Interesting Tidbits: Blog, Videos, Shop...
Published: Fall, Winter, Spring, Summer


URL: http://sockreport.businesscatalyst.com
Date Began: 2010
Patterns: Pay (all 6.50, collections 16.00)
Focus: All patterns made with sock yarn
Interesting Tidbits: Blog, Shop...
Published: March, June, September, December


Sunday, May 27, 2012

Sunday, May 20, 2012

The Boy and the Monster

Pattern: Lurleen the Laundry Monster by Rebecca Danger 
Yarn: Brown Sheep Co. Lambs Pride Super Wash Bulky
Colorway: Cinnamon Twist
Needle: US 9 DPN

I'm posting after a very long and tiring day and for the life of me I can't get two of the pictures to turn. I hope that you enjoy.


The Beginning


Looks like the head but it's the bottom.

Starting to take shape.


Looking good.

Add some limbs.

Introductions

Love at first sight.


A little kiss.

Loves his Grandma and his monster.


Thursday, May 3, 2012

Graduation and Good-Byes


YEAH!! I graduated Knitting Boot Camp.


The class was a blast and Brenda Geiger  is the best teacher there is.


I left with a wealth of knowledge.

Completed Project


I made a scarf for next winter. 
Yarn: Shepard’s Wool Mill Ends.
Yardage: 100+
Needles: Lantern Moon US6
Stitch Pattern: Seafom

 Next Project


Pattern: Goodale
Yarn: Madelinetosh Tosh Merino DK
Colorway: Fjord
Needles: addi Turbo Curricular US 7 

Good-Bye      
I am so bummed. For those who live in or close to Detroit, the Detroit location of City Knits is closing. It is and has been for some time the only yarn shop in Detroit. A yarn shop is so much more than a store that sells yarn. It is a haven for like minded individuals to get together, talk, enjoy each other’s company and of course knit and crochet.

There’s something about visiting a yarn store that’s inspiring. City Knit’s had lots of knitted and crocheted items around the store so you could see and feel how different yarns could be used. Plus it’s nice to chat with the staff and discuss yarn and fiber arts crafts.

With the current economy, people are visiting larger chains like Joann’s and Michaels with coupons in hand, or purchasing their yarn from the Internet so LYS can be struggling right now.

City knits does have another location out in the suburbs but the distance is horrible. The city location is 8 miles from my house verses 32 miles from my house to the suburban location. Needless to say, I can’t make it to the burbs with my work schedule as much as I could the city location. May of their customers are in the same pickle.  I’ll be lucky to make it once a month. So sad.


Thursday, April 19, 2012

FIGURE 8'S ARE NOT JUST FOR SKATING

Knitting Boot Camp is still going on and I'm really enjoying it. I didn't think that I this much to learn. A few weeks ago while learning a variety of cast on's I was introduced to the figure 8 cast on and the magic loop.

The figure 8 cast on is similar to the Turkish cast on. It is done with two needles (circulars being ideal), and it produces an extra row of live stitches, which can be used as a top or bottom edge or as a way to work in the round. The only real difference is that, instead of wrapping the yarn around both needles at the same time in one direction (Turkish cast on), you wrap around the needles individually, moving the yarn around one needle in one direction and around the other in the opposite direction in a figure 8 (hence the name). Since the wraps aren’t anchored to anything, the stitches tend to loosen as you work across, so this cast on works better with fewer stitches, like the toes of socks and centers of scarves.

Here is how it’s done: 
1. Make a slip knot around one needle.
2. Hold both needles in your right hand, and point the tips left. The needles should be side-by-side, like the planks in a floor, and the slip knot is on the needle closest to you.
3. Grab the working yarn with the thumb and index finger of your left hand and guide it around the needles in the following way, keeping the needles more or less still.
a. Guide the yarn over the needle that is farthest from you, lead it down behind that needle, bring it under the needle and toward you, then pull it up between the needles. This puts a yarn over on the needle.
b. Guide the yarn over the needle that is closest to you, lead it down in front of that needle, bring it under the needle and away from you, then pull it up between the needles. This puts a backward yarn over on the needle.
c. Repeat A and B until the right number of stitches has been cast on to each needle. I always cast on one extra stitch so I can ignore the slip knot that is on one needle and the partial wrap that is on the other.
4. Gently tug on the tip of the needle that is closest to you, stopping when the wraps or stitches are in the center of the needle or on the cable if you’re using a circular. Then drop the tip.
5. Knit the wraps or stitches on the other needle in the usual way. The stitches are sloppy and loose so it helps to hold them in place with the fingers of your right hand.
6. Continue working back and forth on that needle, or work in the round as you normally would.
When it’s time to work the stitches on the idle needle, remember that they’re wrapped in the opposite direction (backward yarn overs), so you’ll need to knit or purl them through the back of the loop to untwist them. Just the first round, after that knit or purl as usual.  


Making the figure-8 wraps is not difficult. The first few times, remembering what direction to wrap feels complicated but I got the hang of it after about 15-20 times. LOL.
Now toe up socks can be added to my to-do list.


Monday, March 12, 2012

Gauge and Consistency

Gauge, oh how I dread that word. I hate making gauge swatches and I hate counting gauge even more. I dislike it so much that I usually have someone at my LYS count mine. Now, why do I feel this way? I don’t know. Maybe it is because I never really understood gauge. My lesson last week in Knitting Boot Camp (KBC) was about gauge and blocking.

So, what did I learn about gauge? Knitting gauge refers to the number of stitches and rows in a given area of knitting. To obtain the correct measurements for a garment, you need to obtain the exact number of stitches and rows stated in your pattern. The needle size indicated in the pattern is the one which most knitters use to achieve this gauge with the recommended yarn. However, every knitter knits a little differently and sometimes, even the type of needles, e.g., plastic, wooden, bamboo, or metal, you use can affect your gauge. Ok, I knew that.

Gauge?

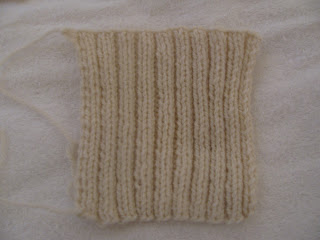
So, how do I know what my gauge is? Make a gauge sample starting with the needle size suggested on your yarn label or band. Cast on enough stitches to work a sample at least 5 inches in width. For my samples I cast on 20 stitches and worked in pattern for 5 inches. I made four swatches, stockinette,  garter, 2x2 rib, and a seed stitch. I know that some knitting experts tell you not to bind off or measure while the swatch is still on the needles because your stitches can become distorted. Don’t tell anyone but we did bind off and blocked our swatches before measuring. (Don’t report us, please!)


For our stitch gauge, we used a ruler (not a measuring tape) and align it along the left side of a column of stitches in the center portion of your gauge sample. Measure horizontally across by counting the number of stitches across two (if counting two inches you have to double the stitch count) or four inches. Is the number of stitches per inch exactly the same as the stitch gauge specified in your pattern instructions?


For your row gauge, (have never heard of that) we counted the number of rows along two (double again) or four inches vertically down the center of our swatch. Typically, obtaining your row gauge is less important than obtaining the exact stitch gauge since lengthwise portion of garments are usually given as a measurement.


Is your gauge off? What to do?

If you have more stitches than your pattern instructions require then, your knitting is too tight and you need to adjust to larger sized needles. You should work another gauge swatch using the larger sized needles and take another measurement.

If you have fewer stitches than your pattern instructions require then, your knitting is too loose and you need to adjust to smaller sized needles. Again, you should work another gauge swatch using the smaller sized needles and take another measurement.

Keep adjusting your needle size until you’ve achieved the gauge specified in your pattern instructions. In general, changing your needle by 2 sizes adjusts your gauge by 1 stitch. When you’ve obtained the gauge specified in your pattern instructions, write down your needle size you used for reference.

( I got my images from the Internet because my pics look like crap)

Monday, March 5, 2012

KNITTING BOOT CAMP

What should you do when you want to take your knitting to the next level? Enroll in Knitting Boot Camp! Knitting Boot Camp (KBC) is a swatch-based workshop where knitters can gain hands-on experience to improve your knitting skills. Well, I couldn’t wait to join. One of the things that I like about the workshop is that it is not for beginners but for advanced beginners or intermediate knitters (I believe that I’m at the intermediate level). The workshop covers casting on and binding off, increases, decreases, seams, pockets, buttonholes, tension gauge, short rows, fitting garments, reading patterns, and more. The curriculum was written by Joan M. Sheridan.
Know I know how to do and have done all of the things that I listed above but just because I know how to do them doesn’t mean that I truly understand them. I can read and follow a pattern or chart but I want to understand why the pattern is written that way it is or how to change it if I want. I also want to start writing my own patterns.
The workshop’s goals are:
·         for participants to build their very own swatch library
·         for participants to become confident knitters
·         for participants to learn to read their knitting
·         for participants to to be able to make better decisions when reading patterns
For each lesson there is homework! Yes, homework. The homework that I had to do before lesson one were four basic swatches. We will be using these swatches in lesson one.
STOCKINETTE STITCH 

GARTER STITCH

SEED STITCH

2X2 RIB STITCH
I know that I’m a blogger that is not consistent with my posting but I want to share my progress with those who want to read about them. I’ll see you next week.

Did I mention that I got this sweet knitting bag from my LYS? Score!!